Music Memory Tricks

Music Memory Tricks

In my last post, I mentioned the four types of music memory:

  • Kinesthetic Memory, where the fingers “know” what to play;
  • Aural Memory, where the performer knows how the piece sounds and can hear the music ahead of the performance;
  • Mental Memory: where the performer can reconstruct the work from a mental understanding of the elements of the work;
  • Photographic Memory: where through genetic luck or extremely hard work, the performer has a visual image of the sheet music in the imagination.

I try to help my students develop only the first three types of music memory. Developing a photographic memory of a single work requires not only a depth of understanding and musicianship that extends well beyond that of most high school students, it also requires a patience and focus that not even I choose to apply.

Here are some music memory tricks I teach my students:

Types of Music Memory

Types of Music Memory

I am aware of four types of music memory that can be used in performance of a piece of music by memory:

Kinesthetic Memory is where the fingers “know” what to play based upon habit. This is the weakest kind of memory, and it is most prone to break when performance conditions change. Yet, it is also the most common and frequently the only form of memory used in performance. A change in instrument (teacher’s piano versus home piano versus stage piano) can throw kinesthetic memory off. The piano keys feel different, and the physical cues that trigger the kinesthetic memory change. When the performer is nervous, or even playing at a different time of day, the body behaves differently, and the kinesthetic memory can again be broken.

Kinesthetic memory also tends to be sequential, in that the memory of a note depends upon the correct performance of the previous note. If a note is played incorrectly, then the sequence is broken, and the body does not remember what comes next. From a performance point of view, kinesthetic memory tends to be passive, and the performer in effect is letting the body do the work instead of intentionally creating an experience that will move both the performer and the audience.

For these reasons, I always encourage students to develop other kinds of memory.

A Busy Fall

It has been an overly busy fall.  Hence, the scarcity of posts the last 2 months.

I have been busy with several projects, and everything has turned out well, it seems:

  • Music Flash Class iOS 8:  Some of you may use Music Flash Class, a highly configurable app for note recognition. It drills, teaches, tests, and even has a group oriented game in it that gets kids hopping out of their seats. I initially wrote Music Flash Class in 2011 because there were no apps that allowed me to teach note reading the way I like to, and still there is nothing as configurable as this app on the market. It survived bug free through iOS 3, 4, 5, 6 & 7, but iOS 8 broke it, and I was faced with reworking it. That is now completed.  Several teachers who emailed me about the app volunteered to test it and make sure it worked on a variety of devices.  I formally submitted Music Flash Class for approval last week, and I’m hoping that Apple releases it today or tomorrow.
Staff Line Hopscotch and the Circle of Thirds

Staff Line Hopscotch and the Circle of Thirds

In previous posts I wrote about the importance of learning the circle of thirds and using fingers as a learning mechanism for the circle of thirds and reading. Here’s a quick and easy floor game suitable for individual or group classes that involves traversing staff and ledger lines. You can play this game with or without fingers, depending upon the level of your student(s).

Staff Line Hopscotch
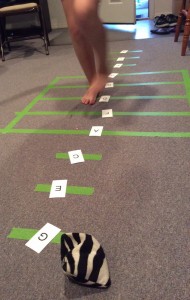
To play the game, you need to mark on the floor a staff (grand or 5 line) and any optional ledgers. You’ll also need markers or cards that have diatonic note names written on them.

I lay on each line of the staff the corresponding note name. A student then takes a bean bag and tosses it to a line. The bean bag is repositioned to the line nearest to where it lands. The student then walks or hops from line to line, naming the note that line represents, and upon arriving to the bean bag, picks up the note name from that line, and continues the hopping & naming to the far end of the staff. We typically start at the lowest note of the staff and work our way up.

Each student takes turns toss, hopping & naming, and picking up their card. They must remember the names of the lines on which there is no card left.

Reading Notes With Fingers

I love my wife Maria. I love that she teaches music. And I love that she shares ideas with me. A couple of weeks ago, Maria gave me a whopper of an idea that I’ve already incorporated into my teaching.

Maria teaches band at Prescott BASIS School. Before the students are given instruments, they are all reading notes. She leads them on a historical journey of how music notation evolved, from early plainsong up to the 5 line staff we know. But, by the end of this 2 week journey through the history of music notation, all of her students can identify notes on any line and ledger line on any clef: The G (treble) clef, the F (bass) clef, and the C clef. They can do this because they can navigate the circle of thirds up and down, if not by memory, then at least by counting their fingers. And that was the idea of hers that I loved: using the fingers to navigate the circle of thirds.